Capturing Spring's Radiance: Your Ultimate Guide To Daffodil Drawing
The vibrant burst of yellow and white that heralds the arrival of spring, daffodils are more than just beautiful flowers; they are symbols of hope, rebirth, and resilience. For artists, the daffodil presents an irresistible subject, its unique structure and cheerful disposition offering endless inspiration. Mastering the art of daffodil drawing allows you to capture this fleeting beauty, transforming a momentary bloom into a timeless piece of art.
Whether you're a seasoned artist seeking new challenges or a beginner eager to explore the world of botanical illustration, this comprehensive guide will walk you through everything you need to know about daffodil drawing. From understanding the flower's intricate anatomy to selecting the right materials and applying advanced techniques, prepare to unlock the secrets to creating stunning and lifelike daffodil artwork.
Table of Contents
- The Enduring Allure of Daffodils: More Than Just a Flower
- Understanding the Daffodil: A Botanical Blueprint for Your Drawing
- Preparing for Your Daffodil Drawing Journey: Essential Materials
- Step-by-Step Guide to Daffodil Drawing: From Outline to Detail
- Beyond the Basics: Advanced Techniques for Daffodil Drawing
- Daffodils in Art and Inspiration: From Poetry to High Jewelry
- Cultivating Your Muse: The Joy of Growing Daffodils for Drawing
- Troubleshooting Your Daffodil Drawing: Common Challenges & Solutions
The Enduring Allure of Daffodils: More Than Just a Flower
Daffodils hold a special place in the human heart, transcending their botanical classification to become potent symbols. Emerging as one of the first plants in spring, often with their bright yellow or white blooms, they symbolize rebirth and hope, warming our souls after the long winter months. This deep-rooted symbolism makes them incredibly rewarding subjects for any artist embarking on a daffodil drawing project.
- Marketa Vondrousova
- Embassy Suites Indianapolis Downtown
- Simply Wholesome
- Landers Toyota Little Rock
- John Stamos Tv Shows
Beyond their universal appeal, daffodils boast cultural significance. For instance, the daffodil is the national flower of Wales, where it is affectionately known as "cennin Pedr" – 'Peter's Leek' in Welsh. This cultural connection adds another layer of meaning to your artwork, allowing you to imbue your daffodil drawing with a sense of history and tradition. Their cheerful disposition and bright hues make them an instant mood-lifter, a quality you can strive to capture in your art.
Understanding the Daffodil: A Botanical Blueprint for Your Drawing
Before you even pick up your pencil for a daffodil drawing, a fundamental understanding of the flower's botanical characteristics is invaluable. The genus Narcissus encompasses what we commonly call daffodils, along with other varieties like jonquils. While "daffodil" is a popular common name, "narcissus" (plural narcissi) is the botanical term for all members of this genus. Knowing this helps in accurately representing the flower's unique features.
Narcissus species originated in Europe and Northern Africa, spreading out in pockets of different climates and habitats. Today, they are distributed throughout the world, a testament to their adaptability and widespread appeal. This global presence underscores their universal recognition and beauty, making your daffodil drawing relatable to a broad audience.
The Anatomy of a Daffodil: Petals, Trumpets, and Stems
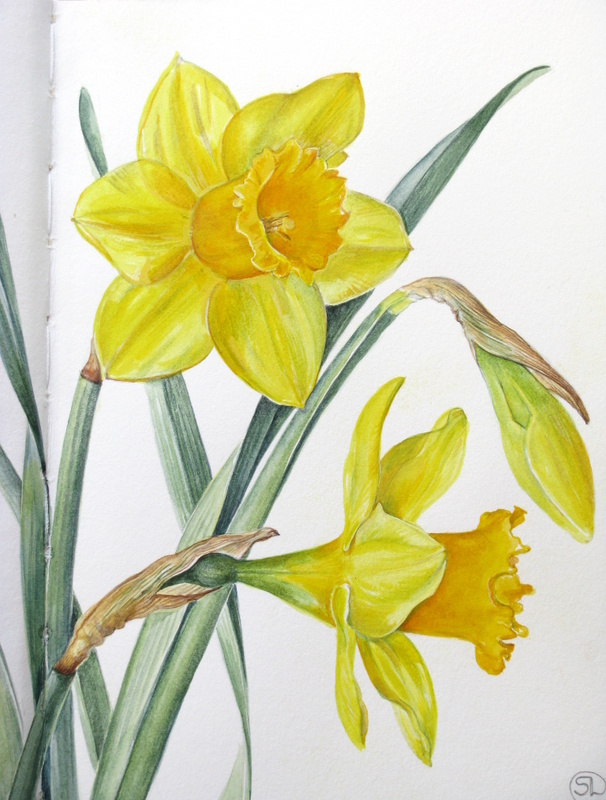
To create a convincing daffodil drawing, it's crucial to understand its distinct parts. A Narcissus flower has conspicuous flowers with six petals, often referred to as perianth segments. These petals form the outer ring. Inside this ring lies the corona, often called the "trumpet" or "cup." This central, usually contrasting, structure is what gives the daffodil its iconic look.
When you approach your daffodil drawing, pay close attention to:
- The Petals (Perianth): Observe their shape – are they broad or narrow? Do they overlap? How do they connect to the base? Note the subtle curves and folds.
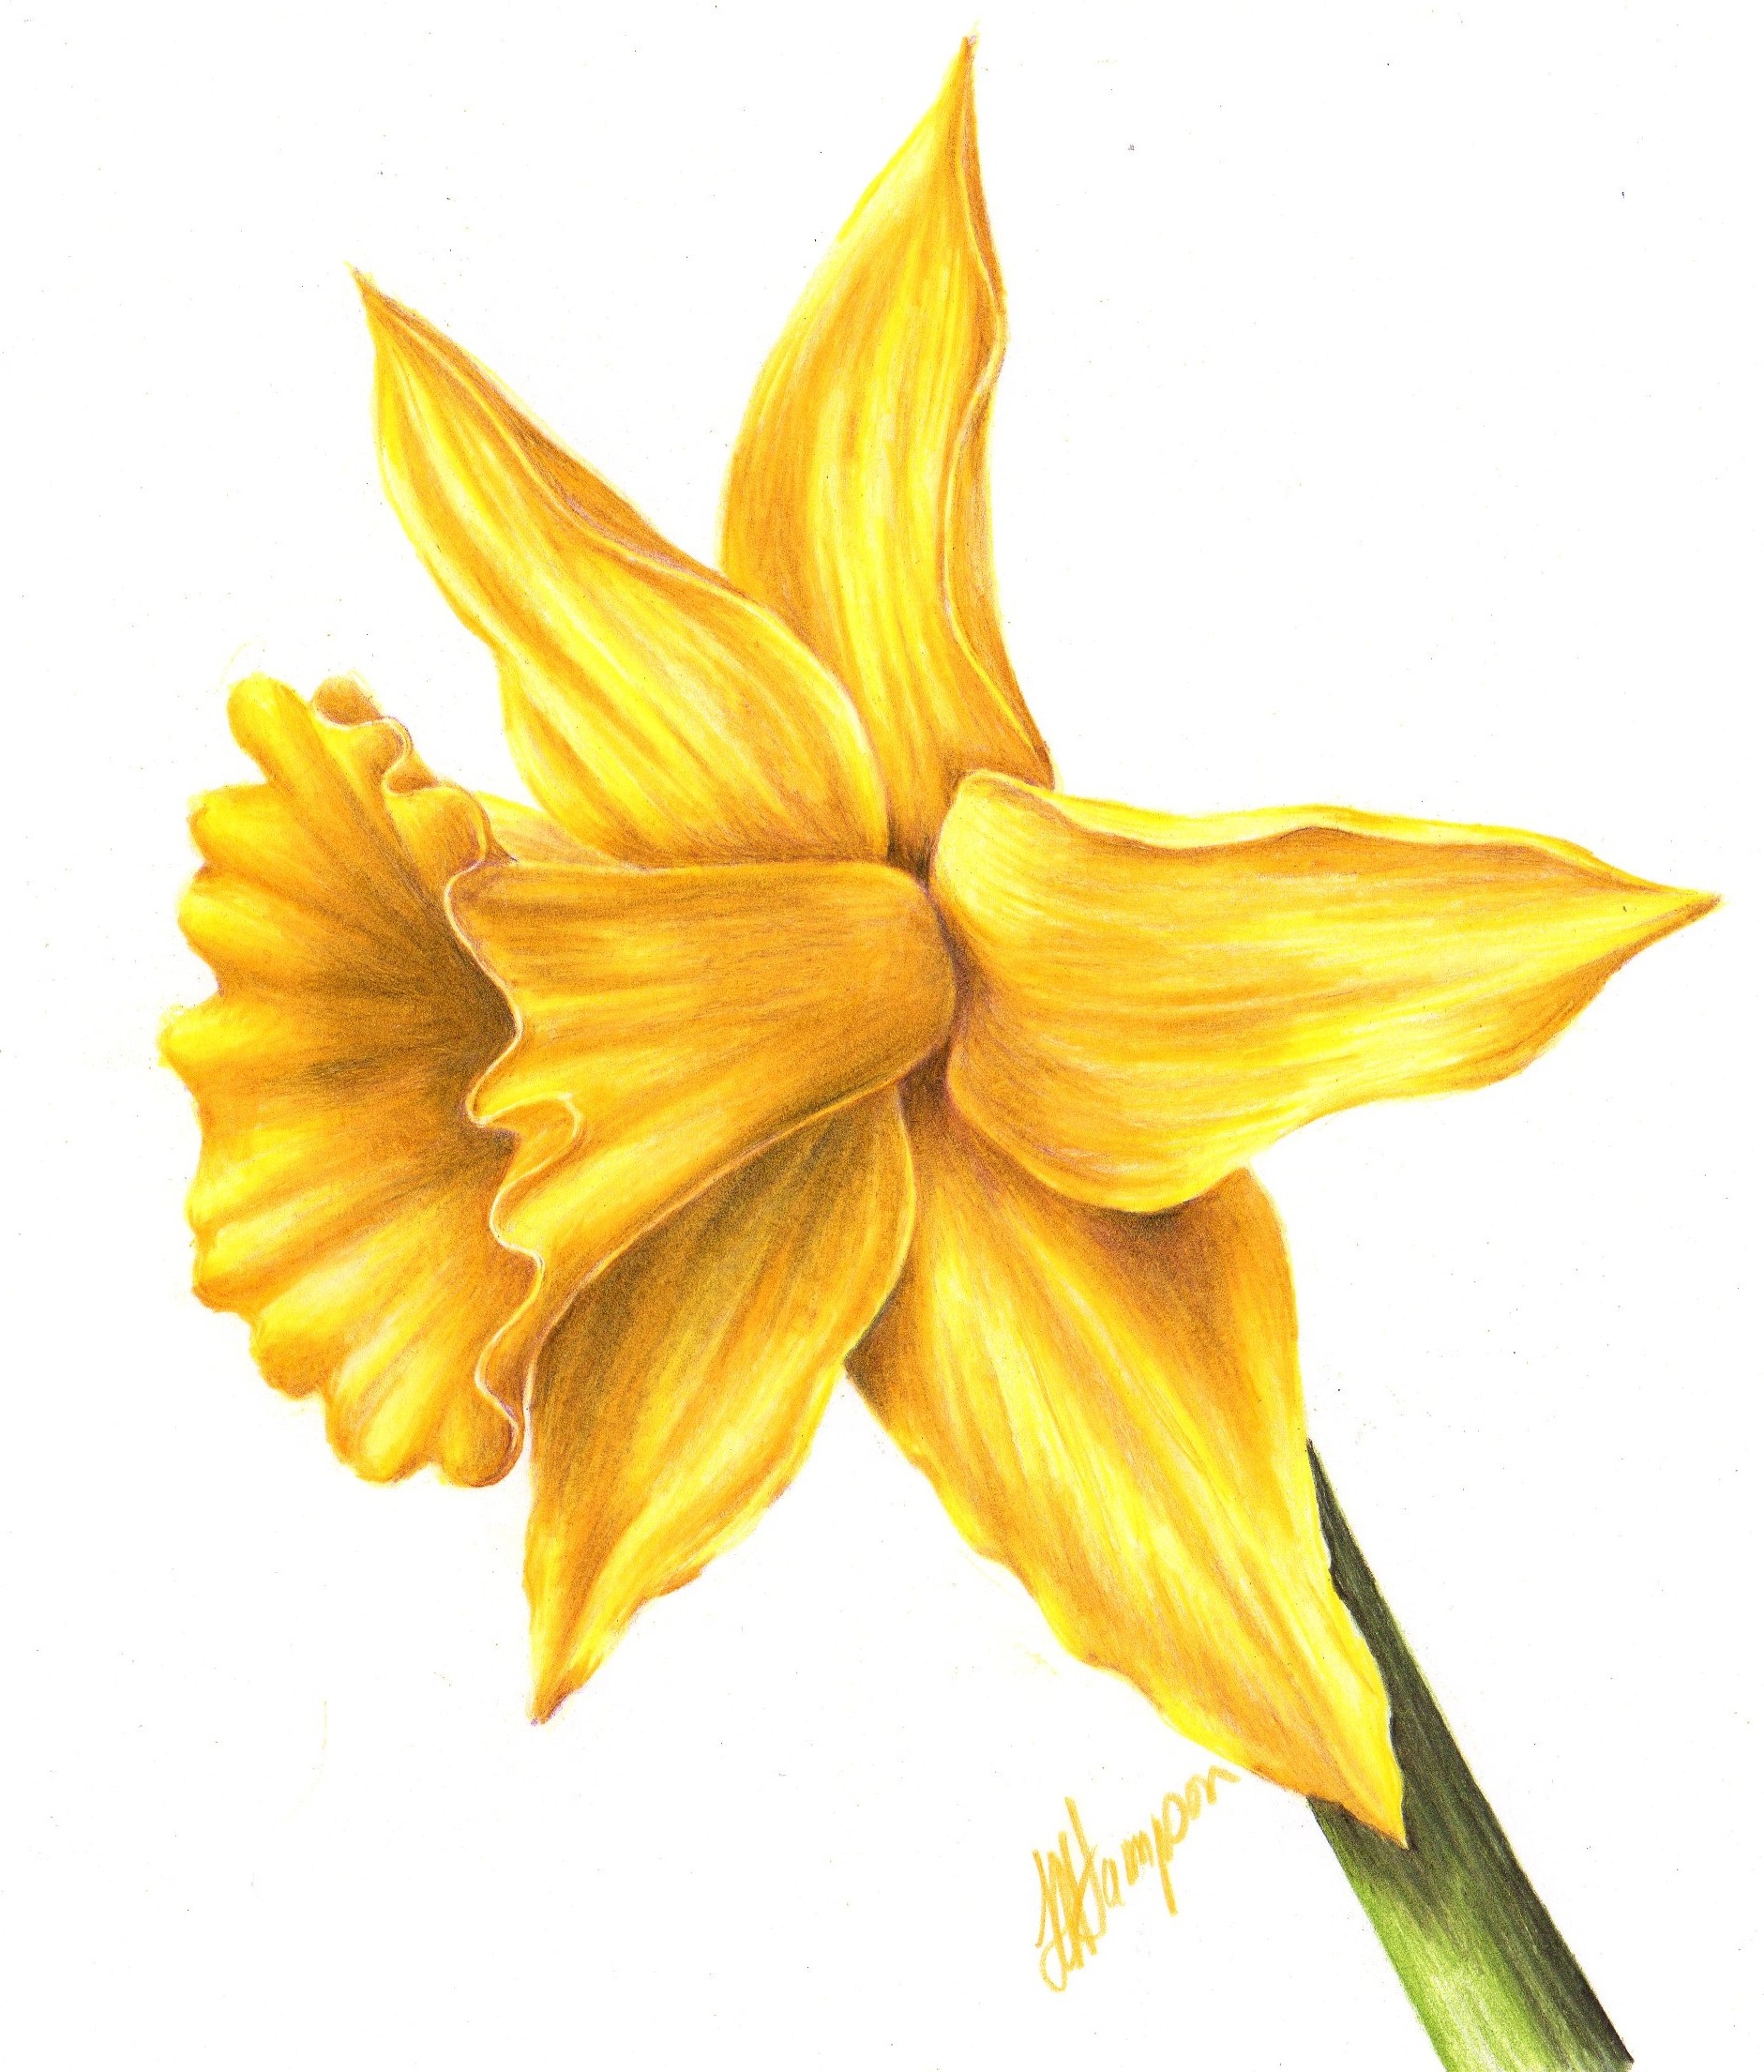
- The Trumpet (Corona): This is the most defining feature. Is it long and narrow, or short and wide? Does its rim ruffle or flare out? The depth and shadow within the trumpet are critical for realism.
- The Stem: Daffodil stems are typically smooth, sturdy, and hollow. They hold the flower upright. Pay attention to how the stem curves and supports the bloom.
- The Leaves: Often strap-like and green, emerging directly from the bulb. While sometimes overlooked, including them can add context and balance to your daffodil drawing.
Understanding these elements will allow you to break down the complex form into manageable shapes, making your daffodil drawing process much smoother and more accurate.
A Spectrum of Daffodils: Exploring Varieties for Artistic Inspiration
While the classic yellow trumpet daffodil is perhaps the most recognized, the world of Narcissus is incredibly diverse. There are thousands of cultivars, offering a wide array of shapes, sizes, and color combinations. Exploring these varieties can significantly broaden your artistic horizons for daffodil drawing:
- Trumpet Daffodils: The quintessential daffodil, with a long trumpet often contrasting with the petals.
- Large-Cupped Daffodils: Similar to trumpets, but with a shorter cup, still prominent.
- Small-Cupped Daffodils: Feature a very short cup, sometimes almost flat against the petals.
- Double Daffodils: These have multiple layers of petals or a very full, ruffled trumpet, creating a lush, voluminous look.
- Triandrus Daffodils: Often have multiple small flowers per stem, with petals that sweep back.
- Cyclamineus Daffodils: Characterized by their reflexed (swept-back) petals, giving them a graceful, windswept appearance.
- Jonquils: A specific type of Narcissus (often with the botanical name Narcissus jonquilla) known for their clusters of fragrant, small, usually yellow flowers with short cups and slender, rush-like leaves.
Each variety presents unique challenges and opportunities for your daffodil drawing. Experimenting with different forms will enhance your observational skills and expand your artistic vocabulary.
Preparing for Your Daffodil Drawing Journey: Essential Materials
The right tools can make all the difference in your daffodil drawing experience. While you don't need expensive equipment to start, having a few key items will set you up for success:
- Drawing Pencils: A range of graphite pencils (e.g., HB, 2B, 4B, 6B) for varying line weights and shading.
- Drawing Paper: Choose paper with a slight tooth (texture) that can hold graphite or pigment well. Sketch paper for practice, and heavier, acid-free paper for finished pieces.
- Erasers: A kneaded eraser for lifting graphite without damaging the paper, and a vinyl eraser for precise corrections.
- Blending Tools: Tortillons (blending stumps) or cotton swabs for smooth shading.
- Reference Material: Live daffodils are ideal! If not available, high-quality photographs are a great substitute.
For adding color to your daffodil drawing, consider:
- Colored Pencils: Excellent for detailed work and layering colors.
- Watercolors: Perfect for capturing the ethereal translucence of petals.
- Pastels (Soft or Oil): Offer vibrant color and a painterly texture.
- Acrylics or Oils: For a more robust, opaque finish, allowing for rich textures and bold strokes.
The choice of medium will influence the final look and feel of your daffodil drawing, so experiment to find what resonates with your artistic vision.
Step-by-Step Guide to Daffodil Drawing: From Outline to Detail
Let's break down the process of creating a compelling daffodil drawing into manageable steps. This approach helps build confidence and ensures a structured workflow.
Capturing Form and Proportion: The Initial Sketch
The foundation of any successful daffodil drawing lies in a strong initial sketch. Don't worry about perfection at this stage; focus on capturing the overall form and proportions.
- Observe Your Subject: Spend time looking at your daffodil. Notice its overall shape, the angle of the flower head, and how the petals and trumpet relate to each other.
- Basic Shapes: Begin by lightly sketching the most basic shapes. A circle or oval for the main flower head, and a cylinder or cone for the trumpet. Use very light, loose lines.
- Establish the Center: Mark the center of the flower and the opening of the trumpet. This helps with symmetry and perspective.
- Petal Placement: Lightly sketch the six petals. Pay attention to their general direction and how they overlap. They don't need to be perfectly symmetrical; natural variations add realism.
- Stem and Leaves: Draw the stem, noting its curve and where it connects to the flower. Add a rough outline for any visible leaves.
- Refine Outlines: Once you're happy with the basic composition, refine your lines, making them a bit clearer but still light enough to erase if needed.
Remember, this stage is about getting the big picture right. Don't get bogged down in small details yet. The goal is a solid framework for your daffodil drawing.
Adding Depth and Life: Shading and Color Techniques
Once your outline is complete, it's time to bring your daffodil drawing to life with shading and color.
- Identify Light Source: Determine where the light is coming from. This will dictate where your highlights and shadows fall.
- Base Shading (Value): Using a lighter pencil (e.g., HB or 2B), apply a base layer of shading to define the general form. The areas facing the light will be lighter, and those in shadow will be darker. Pay particular attention to the inside of the trumpet, which will often have significant shadow.
- Build Up Layers: Gradually build up darker tones using softer pencils (4B, 6B) or by applying more pressure. Focus on the curves of the petals and the depth within the trumpet. Daffodils often have subtle veins and creases on their petals; hint at these with delicate lines or variations in shading.
- Color Application (if applicable):
- Colored Pencils: Layer colors lightly, building up intensity. Use yellows, oranges, and even hints of green or brown for depth. Observe the subtle color shifts on the real flower.
- Watercolors: Start with light washes, allowing them to dry before adding subsequent layers for darker tones and details. Use wet-on-wet techniques for soft blends and wet-on-dry for sharper edges.
- Highlights: Use your kneaded eraser to lift graphite for highlights, or leave areas of the paper untouched if working with color. Highlights are crucial for making your daffodil drawing appear three-dimensional and vibrant.
- Details and Texture: Add finer details like the ruffled edge of the trumpet, subtle textures on the petals, and any unique markings. Don't overdo it; sometimes less is more.
Patience and observation are key. Continually compare your daffodil drawing to your reference, making adjustments as you go. The interplay of light and shadow is what truly gives your drawing form and presence.
Beyond the Basics: Advanced Techniques for Daffodil Drawing
Once you're comfortable with the fundamental steps, you can explore more advanced techniques to elevate your daffodil drawing:
- Perspective and Angle: Experiment with drawing daffodils from different angles – looking down into the trumpet, a side profile, or even from below. This adds dynamism and interest.
- Composition: Instead of a single bloom, try a cluster of daffodils. Consider the rule of thirds, leading lines, and negative space to create a balanced and engaging composition. How do the stems interact? How do the flowers overlap?
- Backgrounds: A simple, blurred background can make your daffodil drawing pop. Consider complementary colors or subtle textures that don't distract from the main subject.
- Mixed Media: Combine different materials, such as ink outlines with watercolor washes, or colored pencils over a graphite base, to achieve unique effects and textures.
- Expressive Style: Don't feel limited by strict realism. Explore more impressionistic or abstract interpretations of the daffodil, focusing on capturing its essence, movement, or emotional impact rather than precise botanical accuracy.
- Light and Shadow Studies: Dedicate practice sessions solely to studying how light falls on the daffodil at different times of day or under various lighting conditions. This deepens your understanding of form and volume.
Pushing your boundaries with these techniques will not only improve your daffodil drawing skills but also foster your unique artistic voice.
Daffodils in Art and Inspiration: From Poetry to High Jewelry
The enduring beauty of daffodils has inspired artists across various mediums for centuries. This rich artistic heritage can serve as a powerful source of inspiration for your own daffodil drawing endeavors.
Perhaps the most famous literary tribute to the daffodil is William Wordsworth's iconic poem, "I Wandered Lonely as a Cloud." His vivid description of "a host, of golden daffodils" dancing in the breeze perfectly captures their joyous and uplifting spirit. Reading such poetry can help you connect with the emotional resonance of the flower, which you can then translate into your visual art.
Beyond poetry, the elegance of floral forms, including daffodils, has found its way into exquisite craftsmanship. High jewelry houses, like Van Cleef & Arpels, are renowned for their distinctive blend of poetry and refinement, often drawing inspiration from nature's fleeting beauty. Their creations, characterized by flowers in full bloom and ethereal butterflies, showcase how natural elements can be transformed into timeless works of art. Whether you explore Van Cleef & Arpels' universe of high jewelry, jewelry, engagement, and watches creations – as seen in their global presence from New York City's historic Madison Avenue boutique to Paris, Tokyo, Seoul, and Shanghai – you'll find examples of how artists interpret and elevate natural forms. This demonstrates that the inspiration for your daffodil drawing can come from unexpected places, pushing you to see the flower not just as a botanical specimen, but as a muse for intricate design and profound beauty.
By exploring how others have interpreted the daffodil, you can gain fresh perspectives for your own daffodil drawing, seeing it not just as a flower, but as a symbol, a narrative, or even a piece of wearable art.
Cultivating Your Muse: The Joy of Growing Daffodils for Drawing
What could be more inspiring for your daffodil drawing than having live models right in your own garden? Daffodil bulbs are incredibly easy to plant and easy to grow, making them an ideal choice for artists who want direct access to their subjects. They require little care beyond the initial planting and will happily keep blooming for 30 years or more, providing a continuous source of inspiration.
Here's what you need to know about growing daffodils to enhance your daffodil drawing practice:
- When to Plant: Learn more about how and when to plant. These bulbs thrive in climates with a winter chill and should be planted in the autumn, shortly after the first frost. This allows them to establish roots before winter sets in.
- Where to Plant: Daffodils are good for flower gardens, landscaping, and naturalizing. They prefer well-drained soil and a spot that receives at least 6 hours of direct sunlight daily.
- How to Plant: Dig a hole about two to three times as deep as the bulb is tall. Place the bulb with the pointed end facing up, cover with soil, and water thoroughly.
- Care: Beyond the initial planting, daffodils are remarkably self-sufficient. They don't need much attention. Once they've finished blooming, allow the foliage to die back naturally, as this process returns energy to the bulb for next year's blooms.
Having your own daffodils allows you to observe them at different stages of their life cycle – from emerging shoots to full bloom to fading petals – offering a dynamic range of subjects for your daffodil drawing practice. You can study them in various lighting conditions, capture their subtle movements in the breeze, and truly understand their form from every angle.
Troubleshooting Your Daffodil Drawing: Common Challenges & Solutions
Every artist encounters challenges, and daffodil drawing is no exception. Here are some common hurdles and how to overcome them:
- Challenge: Flat-looking Flowers.
- Solution: Focus on shading to create depth. Identify your light source and apply darker tones in areas of shadow (e.g., inside the trumpet, where petals overlap). Use highlights to make parts of the flower appear closer to the viewer.
- Challenge: Petals Look Stiff or Unnatural.
- Solution: Observe the subtle curves and undulations of real petals. Avoid drawing them as perfectly straight lines. Use lighter, looser strokes in your initial sketch, allowing for natural variation.
- Challenge: Trumpet Doesn't Look Round or Three-Dimensional.
- Solution: Think of the trumpet as a cylinder or cone. Use elliptical shapes for the opening and base. Shading within the trumpet is crucial; it will be darkest at the very back and gradually lighten towards the opening.
- Challenge: Difficulty with Yellow/White Colors.
- Solution: For yellow, use a range of yellows (lemon, cadmium, ochre) and incorporate very light touches of orange, brown, or even a hint of purple in the shadows to prevent it from looking flat. For white, focus on the shadows and highlights. White objects are rarely pure white; they reflect colors from their surroundings. Use cool grays, blues, or very light purples in the shadowed areas to define the form.
- Challenge: Lack of Detail or Texture.
- Solution: Use finer pencils or brushes for delicate details like veins on petals or the ruffled edge of the trumpet. Don't feel you need to draw every single detail; suggest textures through subtle variations in shading or line work.
- Challenge: Getting Discouraged.
- Solution: Every drawing is a learning experience. Don't compare your work to others, especially professionals. Focus on your progress. Take breaks, come back with fresh eyes, and remember the joy of the creative process.
Practice is paramount. The more you engage in daffodil drawing, the more intuitive the process will become, and the better you'll be at overcoming these common artistic hurdles.
Conclusion
The journey of daffodil drawing is a rewarding one, allowing you to connect with nature's beauty on a deeper level. From understanding the botanical intricacies of the Narcissus genus, with its conspicuous six petals and central trumpet, to mastering shading and color techniques, you now have a comprehensive guide to bringing these symbols of rebirth and hope to life on paper. We've explored their historical significance, their presence in various art forms from poetry to high jewelry, and even the practical joy of cultivating them in your own garden.
Remember, the bright, cheery blossoms of daffodils are extraordinarily rewarding every spring, warming our souls from the previous winter months, and capturing them through art extends that warmth indefinitely. So, pick up your pencils, observe the delicate dance of light on their petals, and embark on your next daffodil drawing adventure. Share your creations with the world, inspire others, and continue to explore the endless artistic possibilities that nature provides. What aspect of daffodil drawing are you most excited to try? Let us know in the comments below, and feel free to explore our other articles on botanical illustration!
- Palos Hospital
- North Harbor Tower
- Heller Ford El Paso Il
- Mac Sinise
- Arturo Merino Benitez International Airport

How to Draw a Daffodil - HelloArtsy
Daffodil Drawing at GetDrawings | Free download
Botanical Daffodil Drawing
