Unlock Your Style: Easy Nail Art Designs For Every Skill Level
Do you dream of beautifully adorned nails but find yourself short on time or intimidated by complex techniques? You're not alone! Many of us love the idea of expressing our personality through our fingertips but assume it requires a professional nail technician, a treasure trove of complicated tools, or an entire afternoon. The good news is, mastering easy nail art designs at home is not only achievable but incredibly rewarding, even if you're a complete beginner. Forget the notion that intricate patterns are the only way to make a statement; sometimes, a simple, chic look is all you need to elevate your style and boost your confidence.
This comprehensive guide is designed to empower you with the knowledge and inspiration to create stunning nail art without the fuss. We'll explore practical tips, essential tools (many of which you already own!), and a plethora of simple yet striking designs that prove you don't have to shell out big bucks or spend hours to achieve a polished, custom manicure. From playful polka dots to sophisticated micro French tips, and even fun seasonal looks, get ready to transform your nails into a canvas of creativity. So, grab your favorite nail polish, and let's embark on this fun and accessible journey into the world of easy nail art!
Table of Contents
- Why Embrace Easy Nail Art Designs at Home?
- Essential Tools for Your At-Home Nail Art Journey
- Prepping Your Canvas: The Foundation of Flawless Nail Art
- Top Easy Nail Art Designs for Beginners (and Beyond!)
- Mastering Techniques for Effortless Application
- Seasonal & Trendy Easy Nail Art Designs
- Caring for Your Masterpiece: Longevity Tips
- Troubleshooting Common Easy Nail Art Challenges
Why Embrace Easy Nail Art Designs at Home?
The appeal of doing your nails at home extends far beyond just saving money. It's about creative expression, convenience, and the sheer satisfaction of a DIY project that yields beautiful results. In our fast-paced lives, finding time for a full salon manicure can be a challenge. That's where the beauty of easy nail art designs truly shines. You don't need a nail tech, complicated tools, or a whole lot of time. Many of these designs can be completed in minutes, making them perfect for a quick refresh before an event or just to brighten up a regular Tuesday.
Moreover, the process of creating your own nail art can be a wonderfully therapeutic and mindful activity. It allows you to experiment with colors and patterns, matching your nails to your mood, outfit, or even the season. It’s a low-commitment way to play with trends without a significant investment. Plus, the sense of accomplishment you get from sporting a unique design you created yourself is unparalleled. It proves that you don't have to shell out big bucks to make a delicious meal, or in this case, a stunning manicure. It's about smart choices and simple techniques.
The Allure of Simplicity: Less is More
For beginners just trying out nail art designs, keeping it simple is key for an effortlessly chic look. There's a common misconception that "nail art" automatically means elaborate, multi-layered masterpieces. In reality, some of the most striking and elegant nail designs are incredibly simple. Think about it: a single pop of color on an accent nail, a delicate line, or a few well-placed dots can create a sophisticated statement that stands out without being overwhelming. These simple looks are not only quicker to achieve but also often more versatile, complementing a wider range of styles and occasions. As nail artists often suggest, sometimes a subtle design, like metallic decals or trendy French tips, can be far more impactful than something overly complex. The focus here is on achievable beauty that looks professionally done, even when it's not.
Essential Tools for Your At-Home Nail Art Journey
One of the most appealing aspects of easy nail art designs is that they don't require an arsenal of expensive, specialized equipment. You likely already possess most of what you need right in your bathroom or kitchen drawer. The core essentials include a good quality nail polish in various colors, a clear base coat, and a durable top coat. These form the foundation of any manicure, art or not. Beyond that, everyday items can be repurposed into surprisingly effective nail art tools. For instance, a toothpick or a bobby pin can be your best friend for creating precise dots or small details. A thin makeup brush (cleaned, of course) can be excellent for fine lines. Even a piece of tape can help you achieve crisp geometric patterns. The key is creativity and resourcefulness.
Investing in a few basic items can certainly enhance your experience, but they are by no means mandatory for starting out. The beauty of these simple designs is their accessibility. You don't need to be a professional artist with a dedicated studio; you just need a steady hand and a willingness to experiment. Remember, the goal is to make it easy and fun, not to create a professional salon setup at home. Focus on what you have and how you can make it work for you.
Beyond the Basics: Elevating Your Toolkit
While simplicity is paramount, if you find yourself enjoying the process and wanting to expand your repertoire of easy nail art designs, a few affordable additions can make a big difference. A dedicated dotting tool set, for example, offers various sizes of tips perfect for creating uniform polka dots or intricate patterns. Thin striping brushes are excellent for achieving clean lines and stripes that might be harder with a regular polish brush. Nail art stickers and decals are game-changers for instant, professional-looking designs without any artistic skill required – just peel and stick! Even a small bottle of rubbing alcohol and a few cotton swabs are invaluable for cleaning up mistakes and ensuring sharp edges. These minor investments can significantly broaden the range of simple yet stunning designs you can achieve, making your at-home nail art journey even more enjoyable and less frustrating.
Prepping Your Canvas: The Foundation of Flawless Nail Art
Just as a chef preps ingredients for a delicious meal, preparing your nails is the most crucial step for any lasting and beautiful nail art design. Skipping this foundational stage can lead to chips, smudges, and a less polished final look, no matter how simple or intricate your design. Begin by ensuring your nails are clean and free of any old polish. Use a non-acetone remover if you have sensitive nails or frequently polish them. Next, shape your nails with a file; whether you prefer short, neat nails or longer, elegant ones, a consistent shape provides a better canvas. Push back your cuticles gently – never cut them, as this can lead to infections. Buffing the nail surface lightly can help smooth out ridges and create a uniform texture for polish application, promoting better adhesion.
Finally, and critically, wipe your nails with rubbing alcohol or a nail dehydrator. This removes any natural oils or residue that can prevent your base coat from adhering properly, significantly extending the life of your manicure. Apply a thin, even layer of a good quality base coat. This not only protects your natural nails from staining (especially with darker polishes) but also creates a smooth, grippy surface for your color coats, preventing chipping. Allow each layer to dry completely before moving to the next. This meticulous preparation might seem like an extra step, but it’s the secret to making your easy nail art designs look professional and last longer, proving that the best results come from solid fundamentals.
Top Easy Nail Art Designs for Beginners (and Beyond!)
Now for the fun part! There are many options to choose from when it comes to easy nail art designs, proving that you can achieve stunning results with minimal effort. We asked nail artists for the most easy nail designs that you can do at home, and their suggestions consistently revolved around simplicity, clever use of tools, and a focus on impact over complexity. Whether you have short nails or long nails, these quick and easy designs are perfect for beginners and seasoned DIY enthusiasts alike. Here are some of the most popular and achievable looks:
Playful Polka Dots & Dainty Dots
Polka dots are perhaps the quintessential easy nail art design, beloved for their versatility and simplicity. From playful, large dots to sophisticated, micro-sized ones, they instantly add charm. To create them, first apply your base color and let it dry completely. Then, using a dotting tool (or a toothpick, bobby pin, or the tip of a pen), dip it into a contrasting polish color. Gently press the tool onto your nail to create a dot. You can create a uniform pattern, random scattered dots, or even a single dot near the cuticle for a minimalist look. For a "dainty dot" effect, use the smallest possible tool and create tiny, almost imperceptible dots, perhaps in a metallic shade over a nude base. This design is incredibly forgiving and perfect for practicing your steady hand.
Chic Stripes & Geometric Flair
Stripes offer endless possibilities for easy nail art designs, from elegant single lines to bold multi-colored patterns. The trick to crisp lines lies in using a thin striping brush or nail art tape. After your base color is dry, apply a strip of nail art tape to create your desired line. Paint over the tape with your contrasting color, and then carefully peel off the tape while the polish is still slightly wet for a sharp edge. For freehand stripes, dip a thin brush into polish and draw straight or wavy lines. You can create horizontal, vertical, or diagonal stripes. For geometric flair, use tape to block off sections and paint different colors, or simply create intersecting lines for a modern, abstract look. This method allows for a very clean and polished finish, making simple lines look incredibly sophisticated.
Modern Micro French Tips
The classic French manicure gets a contemporary update with micro French tips, making it much easier to achieve at home. Instead of the traditional thick white tip, a micro French tip involves a very thin line of color along the free edge of your nail. This delicate approach is more forgiving than trying to paint a perfect thick curve. After applying a nude or clear base coat, use a very fine brush (or even the edge of your regular polish brush if you're careful) to draw a thin line along the very tip of your nail. You can use classic white, or experiment with chic colors that make a statement, like shimmery white, sapphire blue, or even metallic shades for a subtle design that stands out. This look is incredibly elegant and perfect for both short and long nails, offering a sophisticated twist on a timeless favorite.
Funky Stickers & Decals: Instant Art
For truly effortless nail art, stickers and decals are your best friends. They require absolutely no artistic skill and offer a vast array of designs, from intricate patterns to cute characters and metallic accents. Simply apply your base color and let it dry completely. Then, using tweezers, carefully peel off your chosen sticker or decal and place it onto your nail. Press down gently to ensure it adheres smoothly, avoiding any air bubbles. Once positioned, seal it with a clear top coat to protect the design and give it a glossy finish. This method is fantastic for those who love doing their nails but don’t have time for a full manicure or complex painting. It's also a great way to experiment with trendy designs like squiggly lines or mismatched nails without the hassle of freehand drawing. They are quick, easy, and deliver instant, professional-looking results.
Mastering Techniques for Effortless Application
Achieving clean and precise easy nail art designs isn't just about the tools or the design itself; it's also about mastering a few fundamental application techniques. First and foremost, patience is key. Allow each layer of polish to dry completely before applying the next. This prevents smudging and ensures crisp lines. For a steady hand, brace your painting hand against a flat surface, like a table, and use your pinky finger to stabilize it against your non-painting hand. This creates a stable anchor, reducing wobbles. When applying polish, use thin, even coats rather than thick, gloopy ones. Thin coats dry faster, are less prone to smudging, and build up a smoother finish.
For intricate details, don't overload your brush or tool with polish. A little goes a long way. If you make a mistake, don't panic! Dip a small brush or a cotton swab into nail polish remover and carefully clean up the edges or smudges. Precision is learned through practice, so don't be discouraged if your first attempts aren't perfect. Even professional nail artists started somewhere. Focus on enjoying the process, and remember that even small imperfections can add to the unique, human touch of your homemade masterpiece. The more you practice these easy nail art designs, the more confident and skilled you'll become.
Seasonal & Trendy Easy Nail Art Designs
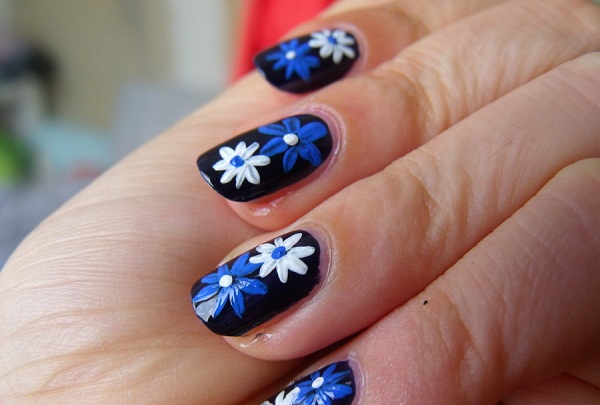
Nail art is a fantastic way to celebrate seasons and embrace current trends without committing to a permanent change. The beauty of easy nail art designs is that they can be quickly adapted to reflect the time of year or the latest fashion. For spring, think pastel colors, delicate floral accents (achieved with tiny dots or simple strokes), or even abstract "cloud" designs using a sponge for a soft, dreamy effect. Summer calls for bright, vibrant hues, fun fruit designs (like tiny strawberries or citrus slices using dots and lines), or playful wavy lines reminiscent of ocean waves. As the leaves change, fall nail art can feature rich, earthy tones, simple leaf motifs, or cozy plaid patterns created with stripes. Winter brings opportunities for shimmery white or sapphire blue polishes, subtle snowflake decals, or even festive simple dots in red and green.
Beyond seasons, current trends like mismatched nails (where each nail has a different, simple design or color) or squiggly lines (easily drawn freehand with a thin brush or even a toothpick) are incredibly popular and simple to execute. The key is to keep the designs relatively simple across all nails to maintain cohesion and prevent the look from becoming too busy. These quick and easy designs ensure your nails are always on point, no matter the occasion or the latest style craze, making your nails a true fashion accessory.
Caring for Your Masterpiece: Longevity Tips
You've put effort into creating your beautiful easy nail art designs, so naturally, you want them to last as long as possible. The final step in any manicure, especially one with art, is the application of a high-quality top coat. A good top coat acts as a protective shield, sealing in your design, adding shine, and preventing chips and scratches. Apply a generous, even layer, making sure to cap the free edge of your nail (painting a thin line along the very tip) to further prevent chipping from daily wear and tear. Allow it to dry completely; quick-dry top coats are excellent for this purpose.
Beyond the top coat, there are daily habits that can significantly extend the life of your manicure. Wear gloves when doing household chores, especially when washing dishes or using cleaning products, as harsh chemicals and prolonged water exposure can quickly degrade polish. Moisturize your hands and cuticles regularly with a good hand cream and cuticle oil; healthy, hydrated nails and skin are less prone to breakage and chipping. Avoid using your nails as tools (e.g., opening cans, scraping labels). If a chip does occur, a quick touch-up with a small brush and the original polish can often extend the life of your manicure for a few more days. By following these simple care tips, your at-home easy nail art designs will stay fresh and fabulous for longer.
Troubleshooting Common Easy Nail Art Challenges
Even with the simplest designs, you might encounter a few common hiccups. Don't let them deter you! Understanding how to troubleshoot these issues will make your easy nail art journey much smoother. The most frequent complaint is smudging. This almost always happens because the previous layer wasn't completely dry. The solution? Patience! Always ensure each coat of polish (base, color, art, top coat) is fully dry to the touch before applying the next. If you accidentally smudge a wet design, gently wipe it off with a cotton swab dipped in remover and restart that nail; it's better to fix it than to have a messy result.
Another challenge can be uneven lines or dots. This often comes down to too much polish on your tool or an unsteady hand. For lines, try using less polish and practice drawing on paper first. For dots, ensure your dotting tool is clean and has just enough polish to create a crisp circle. If your polish seems too thick or gloopy, a few drops of nail polish thinner (not remover!) can revive it. If you struggle with precision, remember that nail art stickers are a fantastic, no-fail alternative. Learning from these minor setbacks is part of the process, and with each attempt, you'll gain confidence and skill, making your at-home nail art experience increasingly enjoyable and successful.
The food network kitchen team develops recipes, tests products, preps for food network shows, produces videos and social content, hosts events and much more. This easy recipe proves that you don’t have to shell out big bucks to make a delicious meal, Onions, flour, butter and some freshly ground pepper are all you need to create. (This part of the data seems irrelevant to nail art, but I've integrated the "don't have to shell out big bucks" sentiment earlier).
Conclusion
As we've explored, creating beautiful and easy nail art designs at home is not only entirely possible but also a wonderfully creative and accessible way to express your personal style. You don't need a salon, a vast collection of tools, or hours of free time. With just a few basic polishes, a touch of creativity, and the simple techniques we've discussed, you can transform your nails into miniature works of art. From playful polka dots and chic stripes to modern micro French tips and instant nail stickers, there's an endless array of options to choose from, perfect for every skill level and occasion. Remember the importance of proper nail preparation, patience between layers, and sealing your masterpiece with a top coat for longevity.
We hope this guide has inspired you to grab your nail polish and start experimenting! The world of easy nail art is waiting for you to discover its joys and endless possibilities. What's your favorite simple nail art design to create at home? Do you have any go-to tips for beginners? Share your thoughts and experiences in the comments below! If you found this article helpful, consider sharing it with friends who love doing their nails, and explore our other beauty guides for more tips and tricks to enhance your self-care routine.
40 + Cute and Easy Nail Art Designs for Beginners – Easyday

6 easy step by step nail art design tutorials for beginners – Artofit

Easy Nail Art Designs Tips at Lisa Wolf blog
