Mastering Ice Cream Drawing: Your Sweet Guide To Delicious Art
Few things evoke a sense of pure delight quite like a perfectly scooped ice cream cone, glistening under the sun. It's a universal symbol of joy, summer, and sweet indulgence. But what if you could capture that ephemeral beauty, that delightful texture, and vibrant color on paper or screen? That's where the magic of ice cream drawing comes in, transforming a fleeting treat into a timeless piece of art. Whether you're a seasoned artist looking for a fun new subject or a complete beginner eager to dip your toes into the world of illustration, drawing ice cream offers a fantastic blend of challenge and reward. This comprehensive guide will walk you through every step of creating mouth-watering ice cream illustrations, from the initial sketch to the final, delectable details. We'll explore essential tools, fundamental techniques, and advanced tips to help you bring your sweetest visions to life.
Embarking on an artistic journey, especially one as delightful as capturing the essence of ice cream, can be incredibly fulfilling. It's not just about replicating an object; it's about conveying texture, temperature, and even flavor through lines, shades, and colors. This article is designed to be your go-to resource, providing clear, actionable advice that adheres to the highest standards of expertise and trustworthiness. We aim to equip you with the knowledge and confidence to create stunning ice cream art that looks good enough to eat, ensuring your artistic endeavors are both enjoyable and successful.
Table of Contents
- The Allure of Ice Cream in Art: More Than Just a Treat
- Essential Tools for Your Ice Cream Drawing Adventure
- Laying the Foundation: Basic Shapes for Your Scoop
- The Art of the Scoop: Adding Volume and Texture
- The Cone Conundrum: Waffles, Sugar, and Beyond
- Toppings Galore: Elevating Your Ice Cream Drawing
- Color Theory for Confectionary Art: Choosing Your Palette
- Beyond the Basics: Advanced Ice Cream Drawing Techniques
The Allure of Ice Cream in Art: More Than Just a Treat
Why choose ice cream as your artistic muse? Beyond its obvious deliciousness, ice cream offers a wealth of artistic opportunities. Its diverse shapes, from the classic scoop to soft-serve swirls, provide interesting forms to practice perspective and volume. The interplay of light on its creamy, often melting surface creates captivating highlights and shadows. Then there's the color palette – a vibrant spectrum ranging from the pastel hues of pistachio and strawberry to the rich depths of chocolate and coffee. Drawing ice cream allows artists to explore texture, from the crispness of a waffle cone to the smooth sheen of a syrup drizzle and the fluffy peaks of whipped cream. It's a subject that evokes nostalgia, happiness, and a universal sense of simple pleasure, making it a highly engaging and relatable subject for any artist. Mastering ice cream drawing is not just about technique; it's about capturing a feeling.
Essential Tools for Your Ice Cream Drawing Adventure
Before you dive into the delightful world of ice cream drawing, gathering the right tools is crucial. Your choice of medium will significantly influence the final look and feel of your artwork. Here’s a breakdown of common tools for both traditional and digital artists:
Traditional Drawing Tools:
- Pencils: A range of graphite pencils (HB for sketching, 2B for shading, 4B or 6B for darker tones) will be indispensable for initial outlines and adding depth.
- Erasers: A kneaded eraser is excellent for lifting graphite without smudging, and a vinyl eraser for precise clean-ups.
- Paper: Choose paper with a slight tooth (texture) for colored pencils or a smoother surface for markers. Watercolor paper is essential if you plan to use wet media.
- Colored Pencils: These are fantastic for building up layers of color and achieving smooth blends, perfect for the creamy texture of ice cream. Brands like Prismacolor or Faber-Castell Polychromos are highly recommended for their rich pigments.
- Markers: Alcohol-based markers (e.g., Copic, Ohuhu) offer vibrant, blendable colors ideal for bold, graphic ice cream illustrations.
- Watercolors: For a soft, translucent, and often dreamy effect, watercolors are superb. They excel at capturing the melt and sheen of ice cream.
- Pastels: Both soft and oil pastels can create rich, vibrant colors and unique textures, though they can be messier.
Digital Drawing Tools:
- Drawing Tablet: A pressure-sensitive tablet (like a Wacom Intuos or Cintiq, or an iPad with Apple Pencil) is fundamental for digital art, allowing for natural strokes and varied line weights.
- Software:
- Procreate (iPad): User-friendly, powerful, and incredibly popular for its vast brush library and intuitive interface.
- Adobe Photoshop: Industry standard, offering extensive tools for painting, photo manipulation, and graphic design.
- Clip Studio Paint: Excellent for line art and comic illustration, with robust painting features.
- Krita / GIMP: Free and open-source alternatives that offer a surprising amount of functionality.
- Brushes: Digital brushes mimic traditional media. You'll want brushes for sketching, flat coloring, blending, and adding texture (e.g., for sprinkles or waffle patterns).
Regardless of your chosen medium, understanding your tools and how they interact with your surface is the first step to successful ice cream drawing.
Laying the Foundation: Basic Shapes for Your Scoop
Every complex drawing begins with simple forms. For ice cream drawing, mastering basic shapes is paramount. Think of the cone as a triangle or a stretched trapezoid, and each scoop as a sphere or an irregular oval. This foundational step is crucial for establishing accurate proportions and perspective before you add any delicious details.
- Trice Funeral Home Obituaries
- Marketa Vondrousova
- The Royal Sonesta Chicago River North
- Omg Squee
- Monopoly Dice Links
- Start with the Cone: Lightly sketch a triangle for a classic pointed cone, or a wider, flatter trapezoid for a waffle bowl. Pay attention to its angle and how it sits on your surface.
- Place the First Scoop: On top of your cone, draw a loose circle or oval for the first scoop. Don't aim for a perfect circle; ice cream scoops are rarely perfectly round. Think of it as a slightly flattened sphere.
- Add More Scoops: If you're drawing multiple scoops, stack them, allowing each upper scoop to slightly overlap and rest on the one below it. Consider how gravity would affect their shape – they won't be perfectly stacked spheres but will subtly conform to each other.
- Establish Perspective: If your ice cream is viewed from above, the top of the scoops will be more visible. If viewed from below, you'll see more of the underside of the scoops and the inside of the cone. Use light guidelines to ensure your shapes recede realistically into space.
- Refine Outlines: Once you're happy with the basic shapes and their arrangement, gently refine your outlines. This is where you can start to hint at the irregular, organic edges of a real ice cream scoop, rather than a perfect geometric form.
This initial "skeleton" provides a solid base, preventing your ice cream drawing from looking flat or distorted later on. It's the blueprint for your sweet masterpiece.
The Art of the Scoop: Adding Volume and Texture
Making your ice cream look three-dimensional and deliciously creamy is where the real fun begins. It's about more than just outlines; it's about understanding light, shadow, and the unique characteristics of a frozen treat.
Capturing Creaminess: Shading and Blending Techniques
To make your scoops pop off the page, you need to understand how light interacts with their surface. Ice cream, being a relatively smooth and somewhat reflective substance, will have distinct highlights and gradual shadows.
- Light Source: First, decide where your light source is coming from. This will dictate where the highlights fall and where the shadows are cast.
- Core Shadow: The darkest part of the scoop, opposite the light source. This helps define its roundness.
- Mid-tones: The general color of the ice cream, gradually transitioning from light to dark.
- Highlights: The brightest spots where light directly hits the surface. These are often small, sharp, and crucial for making the ice cream look wet or glossy.
- Reflected Light: Sometimes, light bounces off the cone or other surfaces and subtly illuminates the shadowed side of the scoop, preventing it from looking flat.
When shading, use smooth, gradual transitions. For traditional media, layering colors with colored pencils or soft washes with watercolors works best. For digital art, use soft brushes and blend modes to achieve seamless gradients. The goal is to create a sense of volume and the characteristic soft, undulating surface of a real ice cream scoop. Don't forget the subtle indentations and ridges that give a scoop its unique, organic shape.
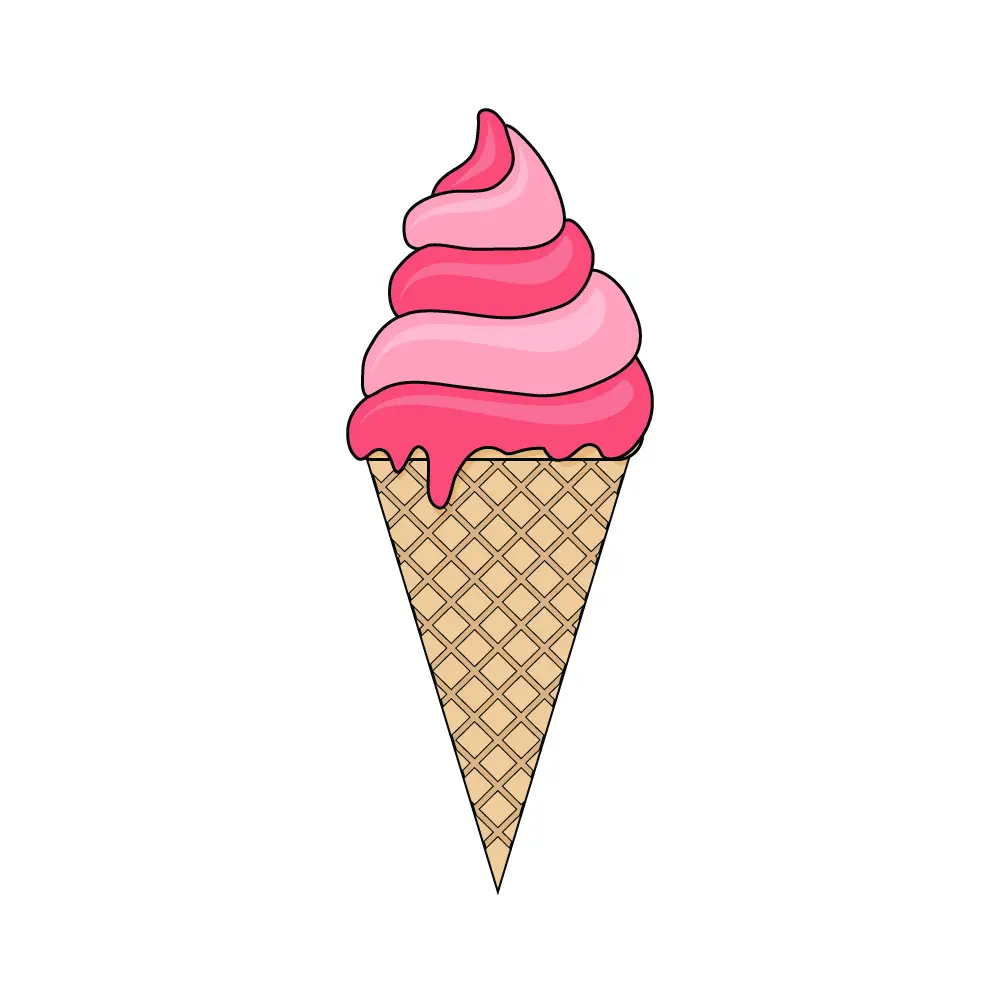
The Meltdown: Drawing Realistic Drips and Puddles
Nothing says "ice cream" quite like a gentle melt. Adding drips and puddles instantly adds realism and a dynamic element to your ice cream drawing. This is where you can truly show the temperature and texture.
- Start with the Source: Drips originate from the bottom edge of the scoop. Lightly sketch irregular, elongated shapes flowing downwards.
- Vary Thickness: Some drips will be thin and delicate, others thicker and more viscous. This variation adds naturalism.
- Gravity's Pull: Remember that drips follow gravity. They will be wider at the top where they detach from the scoop and narrow as they fall, possibly pooling at the bottom of the cone or on the surface below.
- Gloss and Transparency: Drips often look slightly more translucent and glossy than the main scoop. Use lighter colors and add sharp highlights to convey this. If they pool, add a subtle reflection of the ice cream above in the puddle.
- Shadows Under Drips: A tiny, soft shadow directly underneath each drip will make it appear to stand out from the surface of the cone, enhancing the 3D effect.
Drawing realistic drips requires observation. Look at reference photos of melting ice cream to understand how the liquid flows and pools. This attention to detail elevates your ice cream drawing from good to truly mouth-watering.
The Cone Conundrum: Waffles, Sugar, and Beyond
The cone is more than just a holder; it's an integral part of the ice cream experience and a fantastic opportunity to showcase texture in your ice cream drawing. There are generally two main types: the waffle cone and the sugar cone, each with its distinct visual characteristics.
- Waffle Cone: Characterized by its crisscross grid pattern.
- Drawing the Grid: Start by lightly drawing diagonal lines in one direction across the cone's surface. Then, draw another set of diagonal lines crossing the first set in the opposite direction, creating a diamond or square pattern.
- Adding Depth: To make the grid look three-dimensional, subtly shade one side of each raised ridge. The lines closest to the light source will be lighter, and those in shadow will be darker. This creates the illusion of depth.
- Irregularities: Waffle cones are rarely perfect. Add slight imperfections, breaks in the pattern, or areas that are darker/lighter due to baking.
- Sugar Cone: Known for its rougher, more irregular texture and often a slightly darker, caramelized appearance.
- Texture: Instead of a uniform pattern, focus on small, irregular bumps and divots. Use stippling (dots) or short, broken lines to suggest this rough surface.
- Color Variation: Sugar cones often have areas of darker browning. Use warmer, richer browns and oranges, varying the intensity to show these baked spots.
- Edge Detail: The rim of a sugar cone often has a slightly uneven, jagged edge, which adds to its rustic charm.
Regardless of the cone type, remember to apply the principles of light and shadow to the entire form. The cone will have its own highlights and shadows, just like the scoops, helping it feel grounded and three-dimensional. A well-rendered cone provides a sturdy and appealing base for your delectable ice cream drawing.
Toppings Galore: Elevating Your Ice Cream Drawing
No ice cream drawing is complete without its delicious adornments! Toppings add color, texture, and personality. Each topping presents a unique artistic challenge and opportunity to enhance realism.
Mastering the Cherry on Top: Shine and Form
The classic maraschino cherry is a vibrant focal point. To draw it convincingly:
- Basic Shape: Start with a simple circle or slightly flattened sphere.
- Gloss: Cherries are often glossy. Add a prominent, sharp highlight (a small, bright white or light-colored spot) on the side facing the light source. This is crucial for making it look shiny.
- Reflected Light: A subtle, softer highlight on the opposite side can indicate reflected light, enhancing its roundness.
- Color Depth: Use varying shades of red, with darker tones in the shadows and brighter ones in the light, to give it dimension.
- Stem: Don't forget the stem! Draw a thin, slightly curved line extending from the top, adding a tiny shadow underneath it to make it pop.
Sprinkles and Syrups: Adding Dynamic Detail
These small details can make a huge impact on your ice cream drawing.
- Sprinkles:
- Variety: Draw them in various lengths, thicknesses, and angles. Don't make them too uniform; natural randomness looks best.
- Color: Use a range of bright, contrasting colors.
- Placement: Some will be embedded in the ice cream, others resting on top. Show this by partially obscuring some sprinkles.
- Shadows: A tiny, soft shadow beneath each sprinkle will make it appear to rest on the surface, rather than being painted flat.
- Syrups (Chocolate, Caramel, Strawberry):
- Flow: Syrups are viscous and flow. Draw them in natural, undulating lines, dripping down the sides of the scoops and cone.
- Gloss: Syrups are highly reflective. Add long, thin, bright highlights along their curves to indicate their liquid, glossy nature.
- Thickness: Show the syrup's thickness by varying the width of the stream.
- Pooling: Where syrup collects, it will form a thicker, darker pool with more prominent reflections.
- Color: Use rich, deep colors. For chocolate, use warm browns; for caramel, golden yellows and oranges; for strawberry, vibrant reds and pinks.
When adding toppings, remember that less can sometimes be more. Overdoing it can make your ice cream drawing look cluttered. Focus on making each topping count, adding to the overall deliciousness.
Color Theory for Confectionary Art: Choosing Your Palette
Color is perhaps the most impactful element in an ice cream drawing. It's what communicates flavor, temperature, and overall appeal. Understanding basic color theory will elevate your ice cream art from merely colored to truly vibrant and inviting.
- Hue, Saturation, Value:
- Hue: The pure color (e.g., red, blue, yellow).
- Saturation: The intensity or purity of the color (how vivid or dull it is). High saturation makes ice cream look more vibrant and appealing.
- Value: The lightness or darkness of a color. Crucial for showing form and depth (highlights are high value, shadows are low value).
- Warm vs. Cool Colors:
- Warm Colors (reds, oranges, yellows): Often associated with energy, excitement, and warmth. Great for strawberry, mango, or classic vanilla.
- Cool Colors (blues, greens, purples): Often associated with calmness, freshness, and coolness. Perfect for mint, blueberry, or even the subtle coolness of a shadow on a vanilla scoop.
Using a slight touch of a cool color in the shadow of a warm-colored scoop (e.g., a hint of blue-purple in the shadow of a yellow vanilla scoop) can make the warm color pop and add realism.
- Complementary Colors: Colors opposite each other on the color wheel (e.g., red and green, blue and orange, yellow and purple). Using small accents of a complementary color can make your main colors appear more vibrant. For instance, a tiny green mint leaf on a strawberry ice cream can make the red appear more intense.
- Analogous Colors: Colors next to each other on the color wheel (e.g., yellow, yellow-orange, orange). These create harmonious and pleasing palettes, great for multi-scoop creations where flavors blend visually.
- Psychology of Food Colors:
- Red/Pink: Often associated with sweetness, fruitiness (strawberry, cherry).
- Brown: Richness, chocolate, coffee.
- Green: Freshness, mint, pistachio.
- Yellow/Orange: Citrus, vanilla, creaminess.
When choosing your palette, consider the flavor you're trying to convey. A rich chocolate ice cream will require deep browns and warm undertones, while a refreshing mint chip will use cool greens with hints of dark brown. Don't be afraid to experiment with slight variations in hue and saturation within a single scoop to create more visual interest and depth.
Beyond the Basics: Advanced Ice Cream Drawing Techniques
Once you've mastered the fundamentals, you can push your ice cream drawing to the next level by focusing on subtleties and overall presentation. These techniques add polish and a professional touch.
Achieving Realism: Highlights, Shadows, and Reflections
The difference between a good drawing and a great one often lies in the nuanced rendering of light. For ice cream, this means:
- Specular Highlights: These are the brightest, most concentrated points of light on a surface. On ice cream, they indicate a wet, creamy, or melting area. Make them sharp and distinct.
- Occlusion Shadows: These are the very darkest shadows that occur where two surfaces meet or where an object casts a shadow directly onto itself (e.g., where a scoop meets the cone, or where one scoop rests on another). These shadows ground your elements.
- Cast Shadows: The shadows an object projects onto the surface it rests on. These are crucial for making your ice cream look like it's actually sitting in space. The shape of the cast shadow will follow the contours of the object and the surface. Remember that cast shadows are usually softer and lighter as they get further from the object.
- Subsurface Scattering: While advanced, a hint of this can make ice cream look more realistic. It's the effect where light penetrates the surface, scatters, and then exits at a different point. For ice cream, this might mean a very subtle glow or translucency around the edges, especially for lighter flavors.
Practicing observation of real ice cream in different lighting conditions will be your best teacher for these advanced lighting techniques.
Creative Compositions: Setting the Scene for Your Sweet Treat
A single ice cream cone is lovely, but what about placing it in a compelling scene? Composition is how you arrange elements within your artwork to create a visually appealing and engaging narrative.
- Multiple Scoops/Flavors: Experiment with different combinations of scoops and colors. Consider how they stack and interact.
- Background Elements: A simple, blurred background (like a park bench, a beach, or a table) can add context without distracting from the main subject. Think about complementary colors for the background that make your ice cream pop.
- Props: Add elements that tell a story – a melting puddle on the table, a spoon, a napkin, or even a hand holding the cone.
- Rule of Thirds: Position your ice cream off-center, along the intersecting lines of a tic-tac-toe grid, for a more dynamic composition.
- Perspective and Angle: Experiment with drawing your ice cream from different angles – eye-level, looking down into the cone, or a dramatic low angle looking up at towering scoops.
A well-thought-out composition elevates your ice cream drawing from a simple study to a piece of art that tells a story and evokes a feeling. Don't be afraid to experiment and find your unique style in the world of ice cream illustration.
Conclusion
From the initial pencil sketch of a simple cone to the vibrant, glistening details of a cherry on top, the journey of ice cream drawing is a delightful exploration of form, light, and color. We've covered the essential tools, demystified the art of the scoop, tackled the textures of cones and toppings, and even delved into the power of color theory and advanced techniques. Remember, every artist's journey is unique, and the most important ingredient in your artistic recipe is consistent practice and a willingness to experiment. Don't be discouraged by imperfections; they are simply stepping stones on your path to mastery.
Now that you're equipped with a comprehensive understanding of ice cream drawing, it's time to put your newfound knowledge to the test. Grab your preferred tools, find some inspiring reference photos (or even a real ice cream cone!), and let your creativity flow. We encourage you to share your sweet creations with us in the comments below – we'd love to see what delicious art you whip up! What's your favorite ice cream flavor to draw? Do you have any secret tips for achieving that perfect creamy texture? Share your thoughts and let's inspire each other to create more delectable art. For more artistic insights and tutorials, feel free to explore other articles on our site and continue honing your craft!

How to Draw Ice Cream - Really Easy Drawing Tutorial
How to Draw An Ice Cream Step by Step

black line ice cream drawing 23212728 Vector Art at Vecteezy
